Looking to add some cheer to your front steps for the upcoming winter season? There is nothing quite like a spruce top arrangement to warm and welcome you and all of your guests throughout the holiday and winter season. Winter arrangements are by far one of my personal favorites; so much fun to create, low maintenance and incredibly long lasting. You definitely get your money’s worth with this project. If they are in a good location, you can look forward to enjoying these all the way from November to the beginning of March!
How to Spruce It Up:
1. First things first, choose which container you will be using. Keep in mind that your terra cotta pots will not be a good option in the winter; some better options are wood, iron or plastic. The latter should handle the swelling that occurs from freezing and unfreezing. We carry several types of four-season planters that are not only a great option for this project, they are also eye catching.
Select a size that suites the area you’re going to display your arrangement, something not too big or small. Once you’ve chosen your container you will need to fill it partially with soil and then top it off with sand. We don’t recommend using all sand because it makes the container very heavy. We also don’t recommend using all soil because the sand is better at holding the twigs in place. However, you could get by with just soil if there is no sand available.
2. Now that you have your container chosen and prepped you are ready for your greenery. Here at Parkview we carry a large assortment of fresh greens: A variety of fir, fresh wreaths and swags, bundles of spruce tops, and more. We also have red-twigged dogwood, curly willow branches, birch poles, and large pine cones to add some contrasting colors and textures to your arrangement. One bundle of toppers fills a 12-14 inch planter quite well. If you like a fuller look you will want to have more than one bundle available, especially for larger planters.
It’s a good idea to have a set of pruners and a pair of gloves on hand because you will get sappy for this next step. Before designing the arrangement, trim the bottom few branches off your spruce tops. This is to allow for plenty of stick to be pushed into the planter, ensuring your arrangements withstand the blustery wind a bit better.
3. You’ve prepped your container and your greens, let’s get to the fun part already! Designing your container completely depends on your own style and preference. If you chose to use birch poles, push those in first; they are good support for the rest of your greens and are a bit harder to add in later.
At this point start pushing your spruce tops into the sand. We like placing the tallest branch at the center and working our way out to the shortest on the sides. However some bundles are all the same height which means you don’t have to sort them at all, you can just start filling your planter, making sure it looks full from all desired angles. As you work, occasionally take a few steps back to get a good look at your design and ensure you are placing your branches where you really want them, keeping in mind where you are planning to place your arrangement. Your planter may end up against a wall so you can make your arrangement slightly more one-sided than if it were being viewed from all sides.
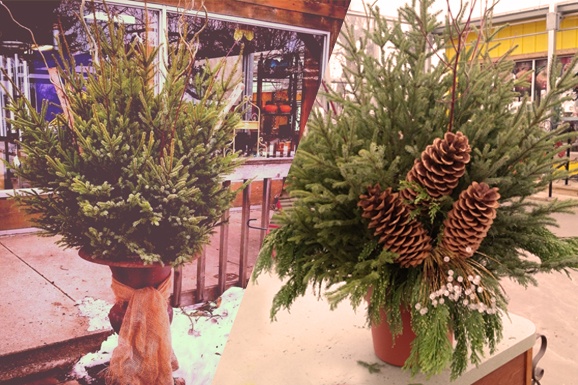
Once all of your toppers are in place, it’s time to stick your dogwood and willow branches in amongst them. If you have pine cones, attach them with some floral wire or anything similar. At this point you are almost done so if you choose, add in some accessories such as a seasonal garden flag, berries, ornaments, lights or decorative garden stakes. The possibilities are truly endless.
4. Now that you’ve got your arrangement looking beautiful, how do you keep it that way? Giving it a good drink of water freezes your branches in place and also provides your greens with some moisture throughout the cold of winter. It’s not necessary to water your planter very often, but it will help keep your arrangements greener for longer if you water it occasionally. You can also use a product called Wilt Pruf; this helps lock in moisture by creating an invisible barrier so those cold blustery winds don’t dry out the needles.
We hope you enjoy your winter arrangement as much as we do ours. Enjoy the compliments from your guests and neighbors this holiday season!