These toad stool mushrooms add an adorable, personalized touch to your garden! They’re fun to make and are easy enough for the kiddos to help with. The hardest part is waiting for the paint to dry! You’ll only need a few items and you might already have them lying around.
Find your vessels.
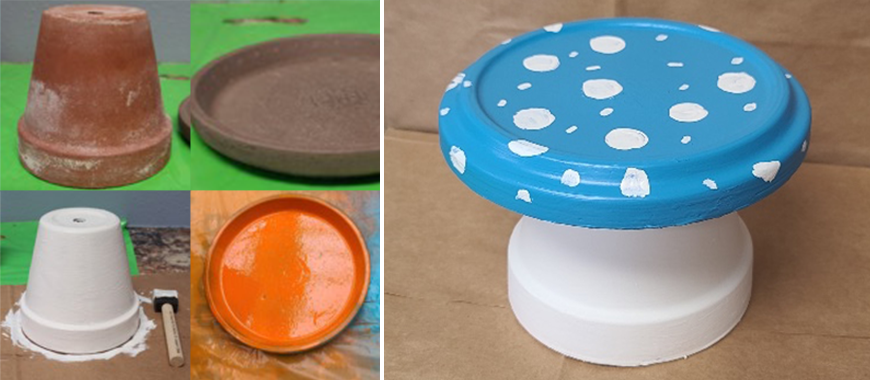
We found some old pottery that needed a serious facelift. We grabbed a terra cotta clay pot for the base and a large saucer for the cap of the mushroom. An oversized saucer makes for a cuter toad stool.

Clean it up.
If you can find old materials to upcycle, you’ll want to clean up any loose dirt. Wipe them down with a rag and then wash them with soap and warm water. They will need to dry fully, so this is a good time to track down your paint.

Paint a base layer.
We started with some old white paint we had in storage but brighter colors would work too. The brush strokes showed through which gave an interesting “organic” feel but you could use spray paint for a smoother finish. It’s best to let the paint fully dry between coats.

Add accent colors.
We painted the mushroom cap a Robin’s Egg Blue. To really pull off the “mushroom effect” you’ll have to flip the set upside down and paint the bottoms. This is a good time to glue the saucer down, if you wish, with an epoxy-type adhesive. We used a Sunset Orange on the bottom of the lid for contrast. Again, let it dry fully before the next step.

Finish with decorations.
We painted white polka dots onto the cap of the mushroom, however, you can decorate your project however you wish! Gradients, glitter, or your own custom designs are interesting ways to personalize your toad stool. Once the decor is dry, you can seal the project with clear coat so it’s safe to take outside.

Now you’re all set to bring this simple yet charming project outside! You can add it to your front porch, garden, or patio for a little spring cheer. Be sure to tag us in your finished pictures!


